
Are you tired of manually clicking buttons in ChatGPT? Well, fret no more! With this incredible hack, you can automate ChatGPT and save valuable time and effort. By automating ChatGPT, you can streamline your workflow and eliminate the need for repetitive tasks. Say goodbye to the mundane process of clicking buttons and let technology take over.
With the power to automate ChatGPT, you can focus on more important aspects of your work and achieve greater efficiency. So, why wait? Automate ChatGPT today and experience a whole new level of productivity!
Say goodbye to the repetitive task and let technology do the work for you. We’ll dive into three different methods that you can use to implement this automation: the injection method, creating a bookmarklet, and developing a Chrome plugin. So, buckle up and let’s get started!
Automate ChatGPT Continue 3 Methods
1. The Injection Method
Alright, let’s begin with the injection method. It’s a simple yet powerful way to automate the clicking of the “Continue Generating” button in ChatGPT. Here’s how it works:
Here is the prompt to generate code :
Can you provide me with JavaScript code that checks for an element with the class “btn” and simulates a click on the element with the text content “Continue generating” every second?
- Copy the JavaScript code that will Chatgpt generate after pasting above prompt.

2. Now, paste that code into the console of your web browser.

3. Hit that enter key and watch the magic happen!
What happens next is that the code will continuously search for the button and simulate a click every second. It’s like having your very own automated assistant doing all the clicking for you. However, it’s important to note that this injected code runs temporarily and will be cleared when you refresh the page. So, if you want to use this method again, simply paste the code into the console once more.
2. Creating a Bookmarklet
Ready for the next method? Great! Let’s dive into creating a bookmarklet. This method adds a touch of convenience to your automation process. Here’s how it works:
Here is the prompt to generate code :
Prompt 1. To get normal code
Can you provide me with JavaScript code that checks for an element with the class “btn” and simulates a click on the element with the text content “Continue generating” every second?
Prompt 2. To get Bookmarklet version of above code
please provide bookmarklet version of this script

- You’ll receive a snippet of JavaScript code from above prompts (first prompt followed by second prompt).
- Right-click on the favorites icon of your web browser.

3. Choose the option to add a new page or bookmark. Click on More
4. Give your bookmarklet a catchy name, such as “Continue Generating.”
5. Now, edit the bookmark and remove the URL completely.

6. Paste the JavaScript code into the URL section of the bookmark.

7. Save your bookmarklet.
Voila! Now, every time you refresh the page, all you need to do is click on your newly created bookmarklet, and the automation will kick in. Just like the injection method, this code runs temporarily until the page is refreshed.
3. Developing a Chrome Plugin
If you’re looking for a more permanent solution, we’ve got just the thing for you – developing a Chrome plugin! This method provides a seamless and hassle-free experience. Let’s see how it works:
Here is the prompt that you need to provide :
now i want to create chrome extension for this. I will not need popup.html javascript:(function() { function simulateButtonClick() { const buttons = document.querySelectorAll(‘.btn’); buttons.forEach(button => { if (button.textContent === ‘Continue generating’) { button.click(); } }); } setInterval(simulateButtonClick, 1000); })();

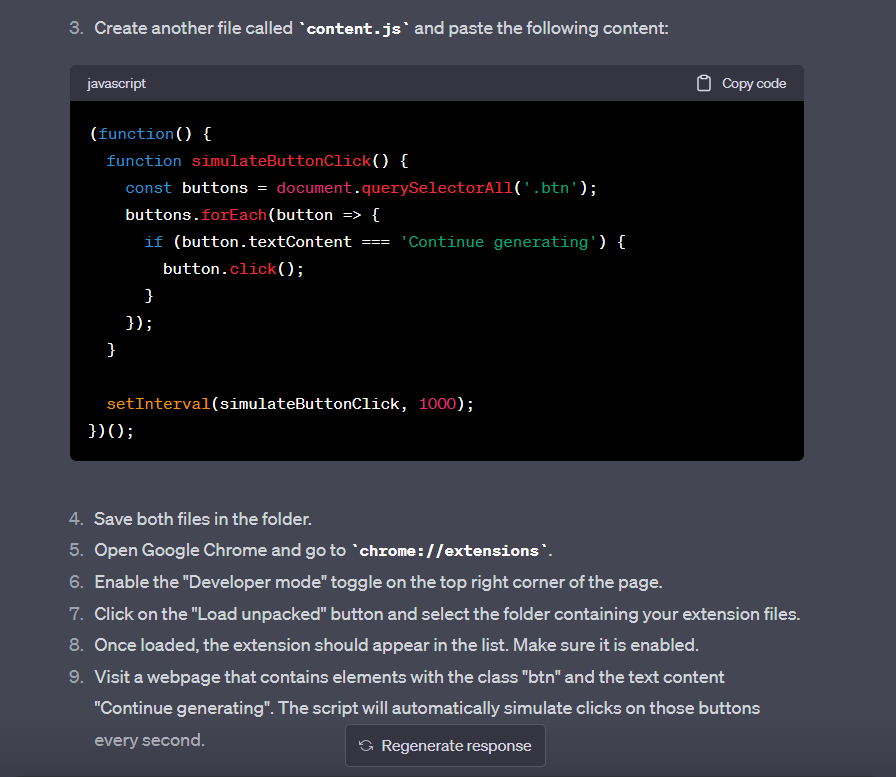
- You’ll need to update the manifest.json file to specify the chatGPT website as the target.

2. Save the code in separate files, such as content.js and manifest.json in Single Folder.
3. Utilize an editor like Visual Studio to manage and work with the code.
4. Load the unpacked extension in Chrome.
5. Finally, head back to ChatGPT and give your newly developed plugin a test run!
Once the plugin is loaded, it will continuously search for the “Continue Generating Answer” button on the ChatGPT website and click it automatically. No more manual intervention required! Now you can sit back, relax, and let the plugin handle the clicking for you.
Conclusion
Congratulations! You’ve discovered three incredible methods to automate the process of clicking the “Continue Generating” button in ChatGPT. Whether you prefer the injection method, creating a bookmarklet, or developing a Chrome plugin, each approach offers its own advantages and flexibility. Say goodbye to the repetitive task of clicking that button and enjoy a streamlined workflow. Remember, you can always ask ChatGPT to explain the code further or provide line-by-line commentary if you want a deeper understanding.
So, go ahead and try out these automation methods. Free up your time, boost your productivity, and let technology lend you a helping hand!
Related Article : Best ChatGPT Plugins For Learning 2023
Can I use these methods with other AI models or platforms?
Absolutely! While these methods are specifically designed for ChatGPT, you can adapt and modify them to work with other AI models or platforms. Just ensure you understand the functionalities and requirements of the specific platform you’re working with.
Can I modify the code to customize the automation behavior?
Definitely! The code provided in this article serves as a starting point. You have the freedom to modify and customize it according to your specific requirements. Feel free to add new functionalities or tweak the automation behavior to suit your preferences.
What should I do if I encounter errors while using these methods?
If you encounter any errors during the implementation of these automation methods, first double-check that you’ve followed the instructions correctly. Ensure you have the latest version of ChatGPT and that the code is properly implemented. If the issue persists, don’t hesitate to seek assistance from the OpenAI support team or the community for troubleshooting help.
Can I learn more about the code and its functionalities?
Absolutely! If you want to gain a better understanding of the code or dive deeper into its functionalities, feel free to ask ChatGPT for explanations. You can request a detailed explanation of how the code works or ask for a line-by-line commentary to grasp each step thoroughly. ChatGPT is here to assist you and enhance your coding knowledge.
Is there any additional information I should know?
Before we wrap up, remember that the automation methods provided in this article are for informational purposes only. Please ensure that you comply with the terms of service and guidelines of the respective platforms when using automation techniques. Use these methods responsibly and at your own discretion.
Ready to automate your ChatGPT workflow? Get started now and enjoy a seamless and efficient experience!
![ChatGPT Plagiarism Checker: Unveiling the Best Tools & Methods [June 2023]](https://thegptime.com/wp-content/uploads/2023/06/ChatGPT-Plagiarism-Checker-210x150.jpg)
![ChatGPT Fund: AI-Powered Investing [June 2023]](https://thegptime.com/wp-content/uploads/2023/06/ChatGPT-Fund-210x150.jpg)